
GLSL Shaders
- Amelia Zhu

- Dec 25, 2020
- 5 min read
Updated: Jan 14, 2021
What's so cool about shaders?
What is amazing about shaders, is that they aren't just useful for graphics programming, they are used in all kinds of data processing, including the
most advanced forms of AI and Machine Learning.
GLSL Communities: https://www.shadertoy.com
GLSL Knowledge: https://thebookofshaders.com/
Work 1
Try to modify the colours of the fragment shader by using the time uniform and a mathematical function.
< basic GLSL setup:
The GLSL Code I need change
======================================================================
precision mediump float;
uniform vec2 u_resolution;
uniform float u_time;
void main() {
vec2 colour = gl_FragCoord.xy/u_resolution.xy;
gl_FragColor=vec4(abs(sin(u_time)),0.5,0.5,0.1);
}
======================================================================
Work 2
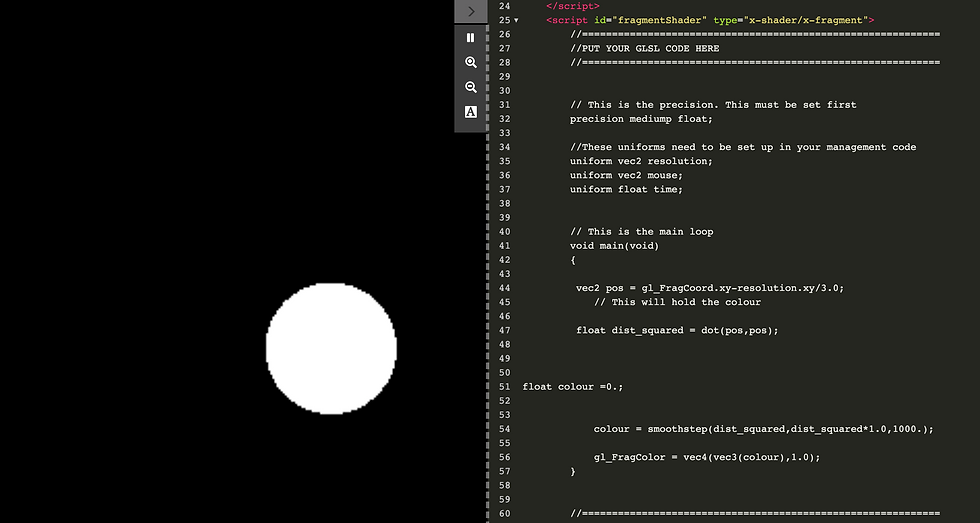
-1 Uncomment the line which uses the distance field to form a circle. How does it
work?
-2 Try to use the 'smoothstep' function to make the edges of the circle smooth.
-3 Now try to change the position of the circle by multiplying the centre of the circle by
the mouse position.
-4 Can you change the colour of the circle based on the y dimension? Make a note of
the effect this has.
< basic GLSL setup:
-1

The GLSL Code I need change
======================================================================
float cooler = distance(gl_FragCoord.xy, pos/1.8);
colour *= 0.02;
if ( color > 1.0 ) ;
// colour = step( color , 1.0 )
======================================================================
-2

The GLSL Code I need change
======================================================================
vect2 pos = gl_FragCoord.xy - resolution.y / 2.0;
float dist_squared = dot(pos, pos);
float colour = smoothstep( 650. , 750. , diet_squared );
======================================================================
-3


The GLSL Code I need change
======================================================================
void main(){
vec2 normCoord = gl_FragCoord.xy/resolution.y;
vec2 pos = vec2(0.5)-normCoord;
// the radius is the length of the hypotenuse
float radius = length(pos)*2.0;
// the angle is the inverse tangent of y/x
float angle = atan(pos.y,pos.x);
// cosine of the angle for complex rose
float petals = cos(angle*1.0*mouse.y*10 *radius); // change this value with mouse.x maybe?
vec3 colour = vec3(step(petals,radius) );
gl_FragColor = vec4(vec3(colour),1.0);
}
======================================================================
-4
The GLSL Code I need change
======================================================================
precision mediump float;
//These uniforms need to be set up in your management code
uniform vec2 resolution;
uniform vec2 mouse;
uniform float time;
// This is the main loop
void main(void)
{
vec2 pos = gl_FragCoord.xy-resolution.xy/3.0;
float dist_squared = dot(pos,pos);
float colour =0.;
colour = smoothstep(dist_squared,dist_squared*1.0,1000.);
gl_FragColor = vec4(vec3(colour),1.0);
}
======================================================================
Work 3
The method instead
-1 What is the main difference? Does it matter?
-2 Uncomment the line which contains the modulo function. Comment out the other
pos2 line as indicated in the code. What is going on here?
< basic GLSL setup:
-1
Step and Smoothstep
The step() interpolation receives two parameters. The first one is the limit or threshold, while the second one is the value we want to check or pass. Any value under the limit will return 0.0 while everything above the limit will return 1.0.
eg:
// Step will return 0.0 unless the value is over 0.5,
// in that case it will return 1.0
float y = step(0.5,st.x);
The other unique function is known as smoothstep(). Given a range of two numbers and a value, this function will interpolate the value between the defined range. The two first parameters are for the beginning and end of the transition, while the third is for the value to interpolate.
eg:
// Smooth interpolation between 0.1 and 0.9
float y = smoothstep(0.1,0.9,st.x);
-2

The GLSL Code I need change
======================================================================
// vec2 pos = gl_FragCoord.xy - resolution.y / 2.0;
vec2 pos = mod( gl_FragCoord.xy , vec2( 100.0 ) ) - vec2( 20.0 )
======================================================================
Work 4
Here you can see a series of functions for creating squares and circles (Remember we're just working on the fragshader code)
You should notice that the square functions create squares, not rectangles.
-1 Create a new called rectangle function that lets you specify the length of the sides
independently.
< basic example:

The GLSL Code I need change
======================================================================
precision highp float;
uniform float time;
uniform vec2 resolution;
void main(void) {
vec2 st = (gl_FragCoord.xy / resolution.yy);
vec2 pos = vec2(0.5)-st.xy;
float size = abs(cos(time))/4. ;
float colour = 1.0;
if (length(pos.x) < size && length(pos.y) < size) colour = 0.2;
// if (distance(st,vec2(0.5))) < size && distance(st,vec2(0.5)) < size) colour =1.;
// I try to use distance function to see whether the result is same with length function, but I failed.
gl_FragColor = vec4(vec3(colour), 1.0);
}
======================================================================
-2 Now try to create a simple picture with lots of rectangles, squares or circles of
different colours. Remember you can add, subtract or multiply the outputs of
functions. Make notes about the kinds of effects this can have.
< basic example:
The GLSL Code I need change
======================================================================
precision mediump float;
uniform vec2 resolution;
uniform vec2 mouse;
uniform highp float time;
float square(vec2 pos, float size) {
vec2 normCoords = gl_FragCoord.xx/resolution;
float aspect = resolution.x/resolution.y;
size*=0.2;
if (length((normCoords.x-pos.x) * aspect)< size && length(normCoords.y-pos.y) < size) {
return 2.0;
}
else {
return 0.;
}
}
float line(vec2 pos, float funct) {
return step(funct,pos.y)-step(funct,pos.y-0.01);
}
float circle(vec2 pos, float size) {
size = 1.*size;
size*=10.;
float aspect = resolution.x/resolution.y;
vec2 normCoord = vec2(gl_FragCoord.x/(resolution.x) * aspect,gl_FragCoord.y/resolution.y);
float colour = distance(normCoord,pos);
return smoothstep(colour * size, colour * size+0.02
,1.0);
}
void main(){
//vec2 pos = gl_FragCoord.xy/resolution;
float rect = square(vec2(0.05,0.08),0.8);
float rect2 = square(vec2(0.25,0.35),0.9);
float rect3 = square(vec2(0.42,0.67),1.0);
float circleOne = circle(vec2(1.1,0.5),0.8);
vec3 squareOne = vec3(0.1,0.22,0.5*mouse.x) * rect;
vec3 squareTwo = vec3(0.3*mouse.x,0.0,0.1) * rect2;
vec3 squareThree = vec3(0.1,0.0,0.8*mouse.x) * rect3;
//vec3 square = vec3(0.0);
//float pct = abs(sin(u_time));
gl_FragColor = vec4(squareOne + squareTwo + squareThree + circleOne,1.0);
}
======================================================================
-3 Now, use a mat2 matrix to skew the sides of the square, or to rotate it. You can copy
the rotation matrix from this code:
< basic example:
The GLSL Code I need change
======================================================================
precision mediump float;
//These uniforms need to be set up in your management code
uniform vec2 resolution;
uniform vec2 mouse;
uniform float time;
#define M_PI 3.14159265358979323846
//Here's how you rotate around the centre of the screen
void main(void)
{
float angle = M_PI * mouse.x;
mat2 rotation = mat2( cos(angle), sin(angle),-sin(angle), cos(angle));
mat2 rotation2 = mat2( cos(angle), sin(angle),-sin(angle), tan(angle));
mat2 scale = mat2(3.,1.,1.,3.);
mat2 scale2 = mat2(2.,0.,0.,2.);
vec2 translate = vec2(resolution.x/6.,resolution.y/6.);
vec2 pos = mod(rotation * (gl_FragCoord.xy - translate), vec2(30.0)) - vec2(20.0);
vec2 pos2 = mod(rotation * (gl_FragCoord.xy - translate), vec2(20.0)) - vec2(10.0);
//dot product is very useful
float dist_squared = dot(pos, pos);
float dist_squared2 = dot(pos2, pos2);
float colour = smoothstep(50.,70., dist_squared);
float colour2 = smoothstep(70.,120., dist_squared2);
gl_FragColor = vec4(vec3(colour) + vec3(colour2), 1.0);
}
======================================================================
-4 It shows you how to create lines.
Do a complex line drawing using a sequence of lines that carry out specific
functions.
Try to create expressions with combinations of sin, cos, tan, atan, pow etc. Look up
the functions on shaderific for some inspiration.
Experiment adding and subtracting the lines together. Remember that when you
combine functions together, every pixel can be affected.
< basic example:
sin x

x to the 5th power

Useful function reference
My practice
The GLSL Code I need change
======================================================================
precision mediump float;
#define PI 3.14159265359
uniform vec2 resolution;
uniform vec2 mouse;
uniform highp float time;
float line(vec2 pos, float i) {
return smoothstep(i-8.0,i,pos.y)-smoothstep(i,i+4.0,pos.y-0.1);
//return step(i,pos.y)-step(i,pos.y-0.01);
}
float line2 (vec2 pos, float i) {
// return smoothstep(i-0.06,i,pos.y)-smoothstep(i,i+0.04,pos.y);
return step(i,pos.y)-step(i,pos.y-3.);
}
void main() {
//vec2 pos = gl_FragCoord.xy/resolution;
vec2 pos = mod(gl_FragCoord.xy, vec2(50.0)) - vec2(20.0);
float y = pow(pos.x * mouse.x ,1.2);
//float y2 = fract( sin(pos.x * mouse.x )); ???
vec3 color = vec3(y*0.1);
// Plot a line
float i = line(pos,y)+line2(pos,y);
color = vec3(i,2.0,0.9);
gl_FragColor = vec4(color,1.0);
}
======================================================================

Comments